SSL certificate_verify_failed errors typically occur as a result of outdated Python default certificates or invalid root certificates.
We will cover how to fix this issue in 5 ways in this article.
Table of Contents
Why certificate_verify_failed happen?
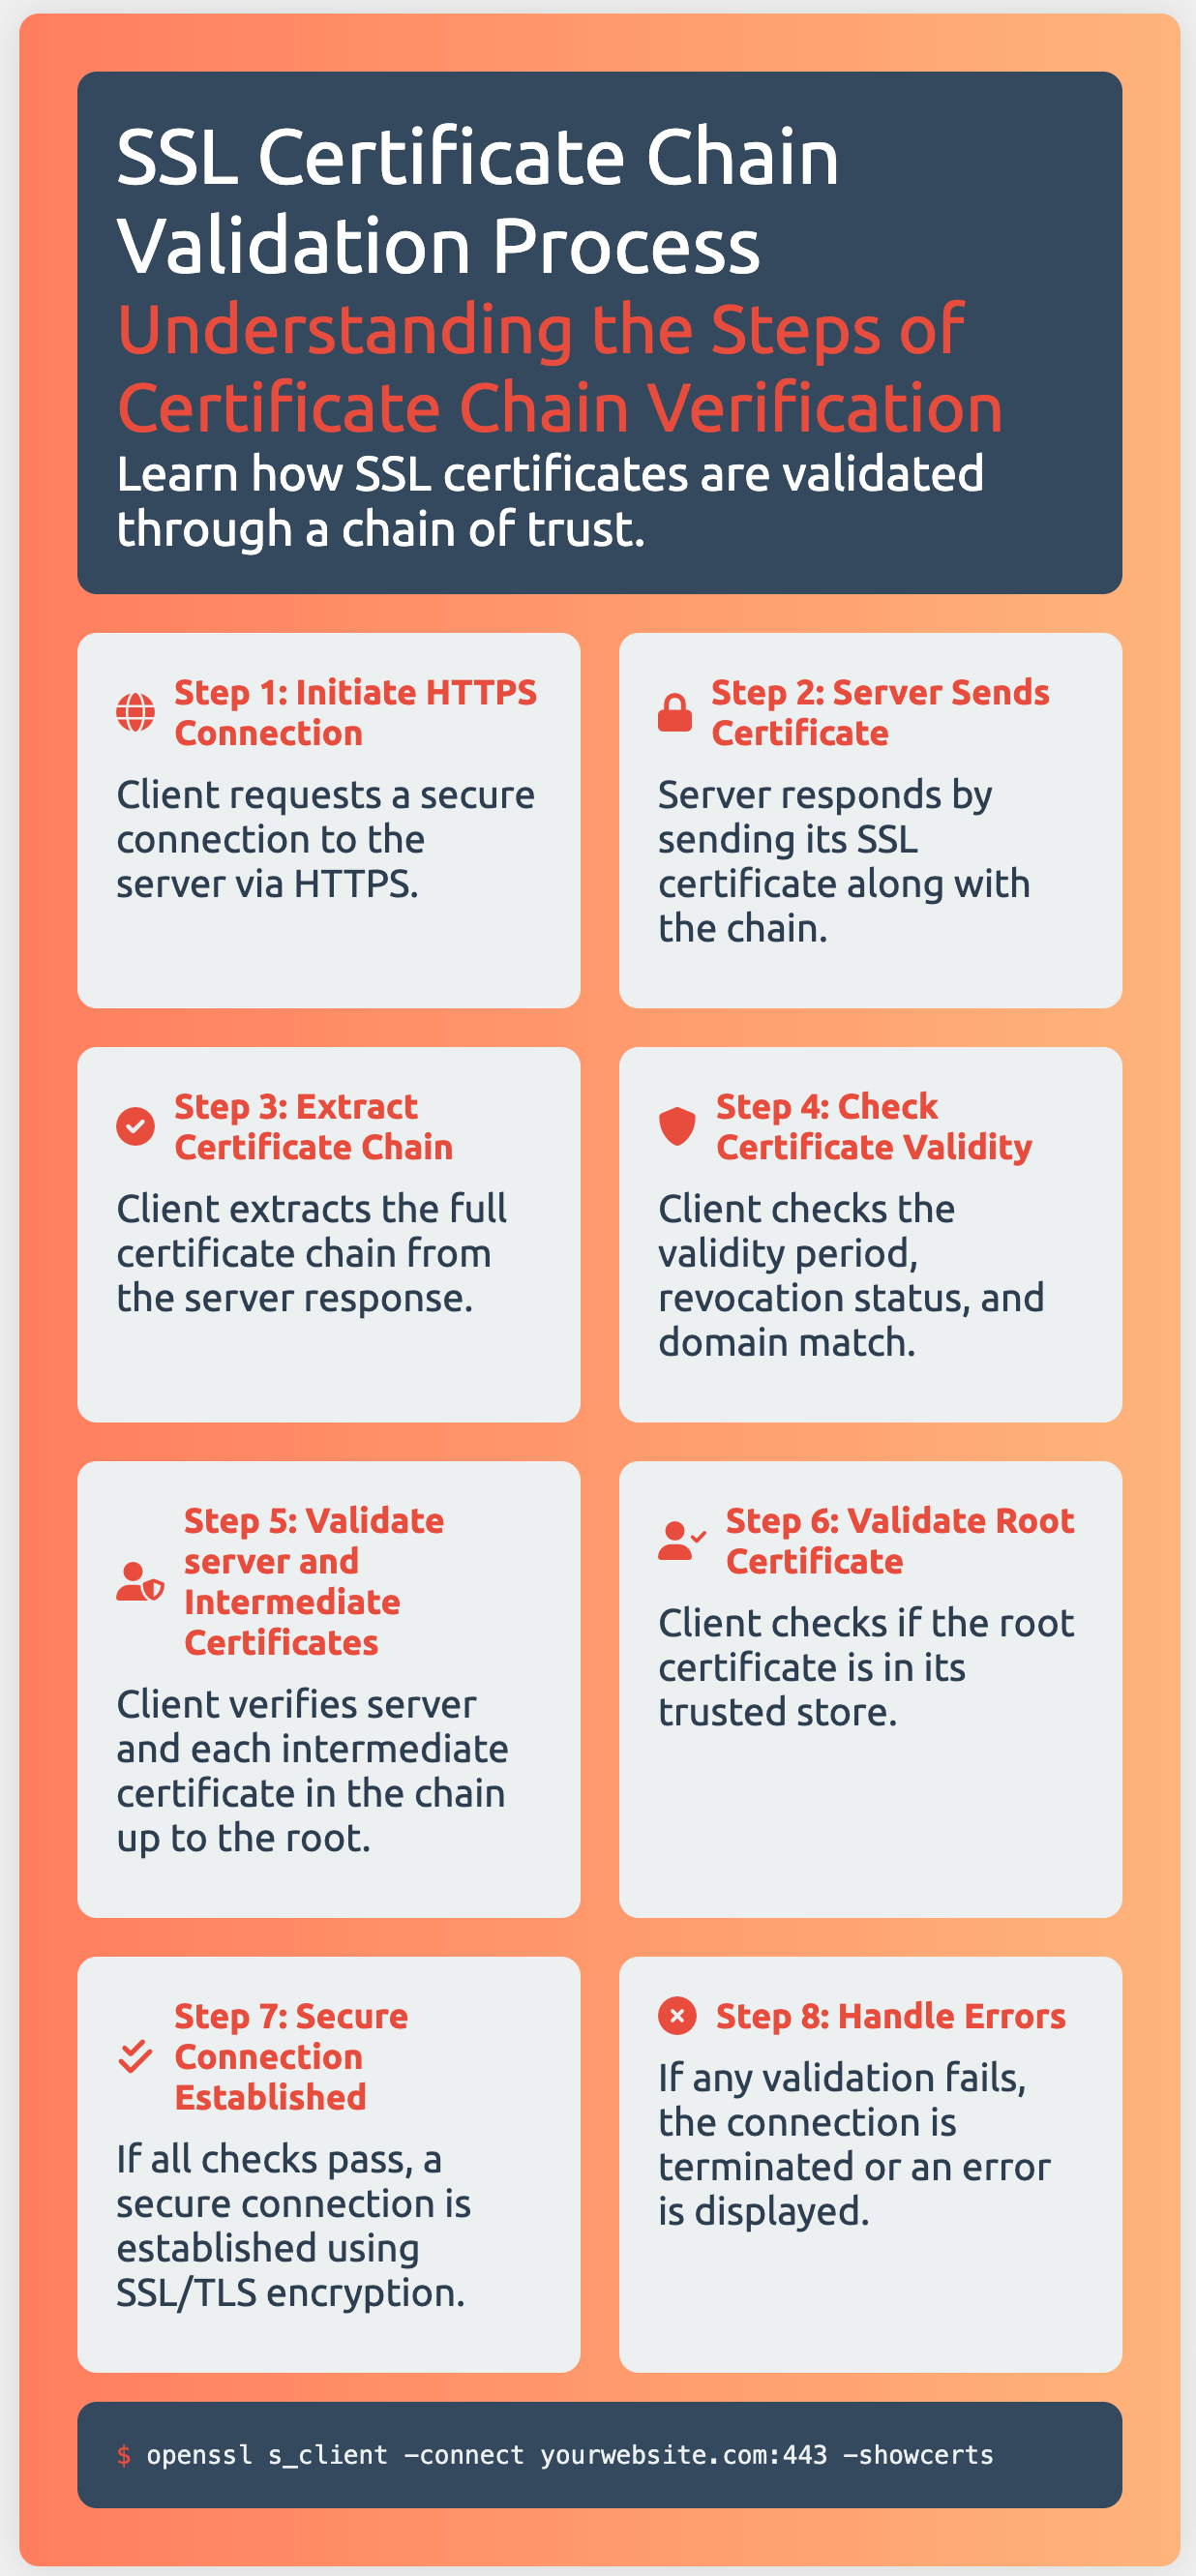
The SSL connection will be established based on the following process. We will get errors if any of these steps do not go well.
Get Your Linux Course!
Join our Linux Course and discover the power of open-source technology. Enhance your skills and boost your career! Start learning Linux today for only $1!- The client sends a request to the server for a secure session. The server responds by sending its X.509 digital certificate to the client.
- The client receives the server’s X.509 digital certificate.
- The client authenticates the server, using a list of known certificate authorities.
- The client generates a random symmetric key and encrypts it using server’s public key.
- The client and server now both know the symmetric key and can use the SSL encryption process to encrypt and decrypt the information contained in the client request and the server response.
For more details, here is a diagram about this process.

For this error certificate_verify_failed, it usually happens in the ssl certificate validation phase.
When the client receives the server’s certificate, it begins chaining that certificate back to its root.
It will begin by following the chain to the intermediate that has been installed, from there it continues tracing backwards until it arrives at a trusted root certificate.
If the certificate is valid and can be chained back to a trusted root, it will be trusted.
If it can’t be chained back to a trusted root, the browser will issue a warning about the certificate.
Related: Check SSL Certificate Chain with OpenSSL Examples
Error info about certificate_verify_failed
We will see the following error.
<urlopen error [SSL: CERTIFICATE_VERIFY_FAILED] certificate verify failed (_ssl.c:777)>
Here is a detailed post about how to check SSL certificate.
What is SSL certificate
Server certificates are the most popular type of X.509 certificate.
SSL/TLS certificates are issued to hostnames (machine names like ‘ABC-SERVER-02’ or domain names like google.com).
A server certificate is a file installed on a website’s origin server.
It’s simply a data file containing the public key and the identity of the website owner, along with other information.
Without a server certificate, a website’s traffic can’t be encrypted with TLS.
Technically, any website owner can create their own server certificate, and such certificates are called self-signed certificates.
However, browsers do not consider self-signed certificates to be as trustworthy as SSL certificates issued by a certificate authority.
Related: 2 Ways to Create self signed certificate with Openssl Command
What is SSL certificate chain
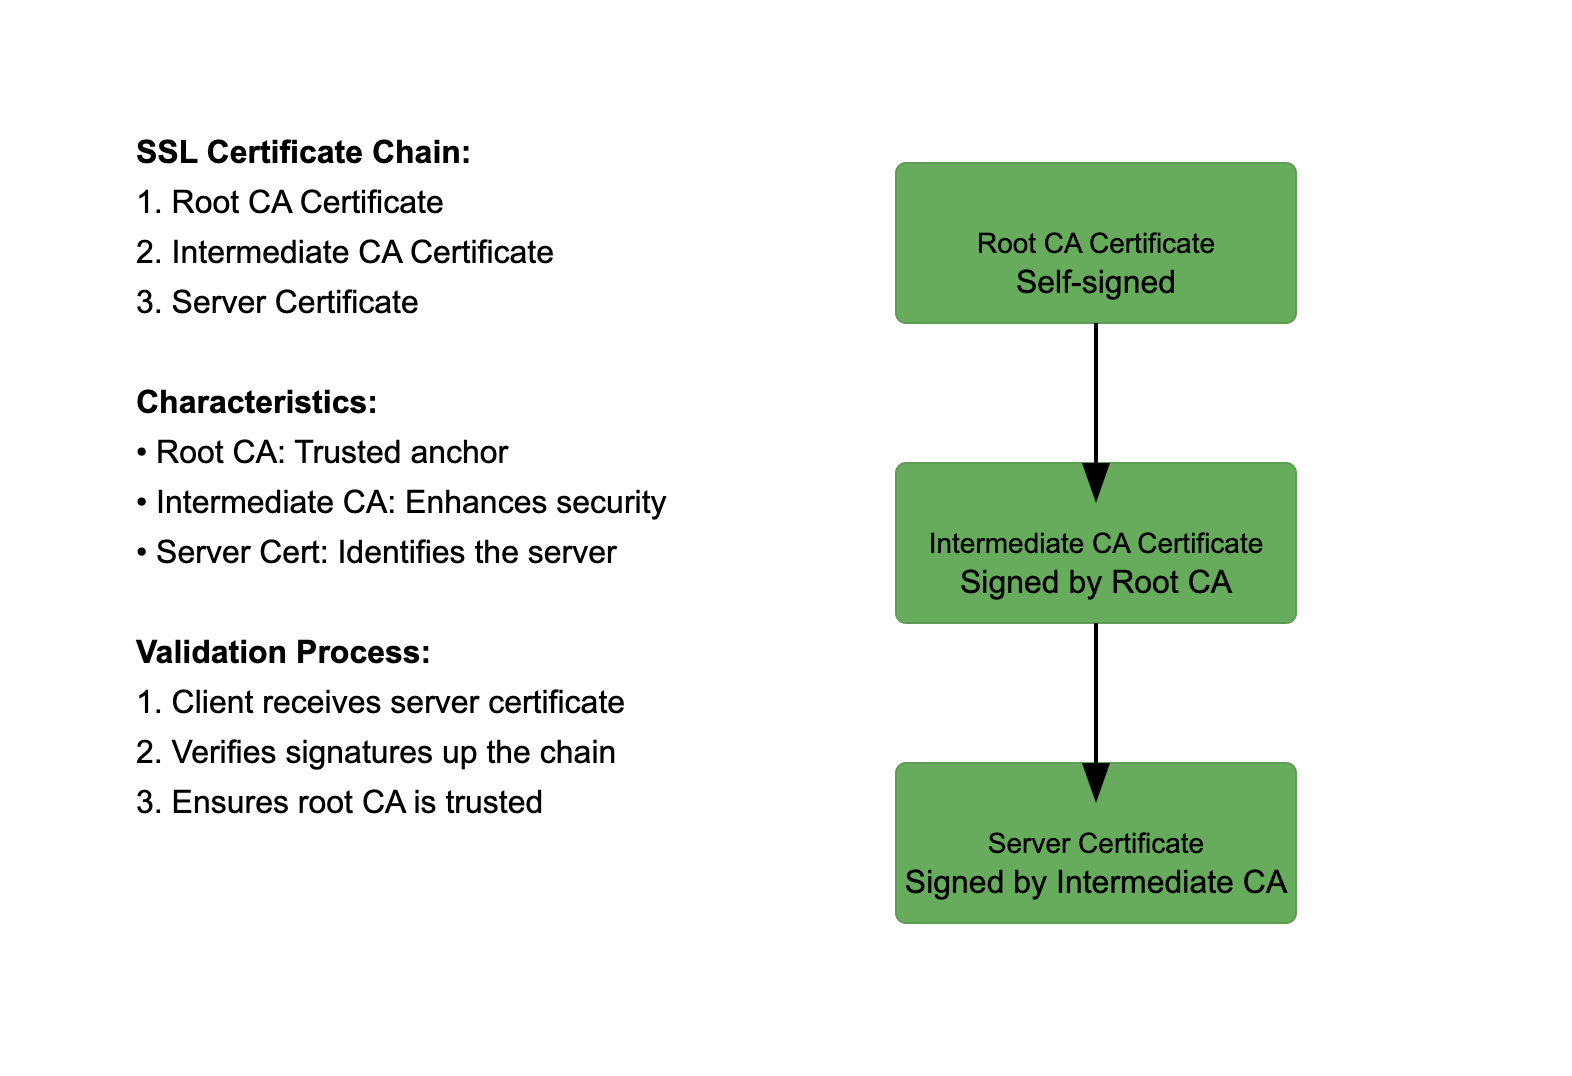
An SSL certificate chain is a sequence of certificates that establish a path from a website’s SSL certificate to a trusted root certificate authority (CA).
This chain of trust ensures that a website’s SSL/TLS certificate is valid and has been issued by a legitimate authority.

Components of the SSL Certificate Chain
- End-Entity Certificate (or Server Certificate):
- This is the certificate issued to the website or server.
- It is what users see in their browsers when they connect to a secure site.
- This certificate is specific to the domain name (e.g., www.example.com) and is the first link in the chain.
- Intermediate Certificates:
- Intermediate certificates act as a bridge between the end-entity certificate and the root certificate.
- They are issued by intermediate Certificate Authorities (CAs) and are used to establish a chain of trust from the root CA to the end-entity certificate.
- There can be one or more intermediate certificates in the chain.
- Root Certificate:
- The root certificate is issued by a trusted Certificate Authority (CA) and is self-signed.
- It is the anchor of the certificate chain and is typically pre-installed in web browsers and operating systems.
- Root certificates validate the entire chain of trust and ensure that the end-entity certificate has been issued by a trusted source.
How to fix certificate_verify_failed?
If you receive the “certificate_verify_failed” error when trying to connect to a website, it means that the certificate on the website is not trusted.
There are a few different ways to fix this error.
We will skip the SSL certificate check in the first three solutions.
For the fourth solution, we are going to install the latest CA certificate from certifi.
Create unverified context in SSL
import ssl

context = ssl._create_unverified_context()

urllib.request.urlopen(req,context=context)
context = ssl._create_unverified_context()
This line creates an SSL context with the _create_unverified_context() function.
By default, when making HTTPS requests, Python performs verification of the SSL certificate presented by the server to ensure its validity.
However, in some cases, such as when dealing with self-signed or expired certificates, you may encounter SSL verification errors.
The _create_unverified_context() function creates an SSL context that does not verify the server’s certificate, allowing connections to be established even if the certificate is not considered valid.
This can be useful for testing or when dealing with certain scenarios where certificate validation is not required or not possible.
Create unverified https context in SSL
import ssl

ssl._create_default_https_context = ssl._create_unverified_context

urllib2.urlopen("https://google.com").read()
Use requests module and set ssl verify to false
requests.get(url, headers=Hostreferer,verify=False)
In the provided code snippet, requests.get() is a function from the popular Python library called “requests” used for making HTTP GET requests.
Here’s an explanation of the different parts of the code:
requests.get(url, headers=Hostreferer, verify=False)
url: This is the URL of the resource you want to retrieve using an HTTP GET request. It should be a string containing the complete URL.
headers=Hostreferer: This parameter specifies the headers to be included in the request. Hostreferer is likely a variable containing a dictionary of headers, including the Host and Referer headers.
verify=False: This parameter is used to control SSL certificate verification. By default, when making HTTPS requests, requests performs SSL certificate verification to ensure the validity of the server’s certificate.
However, in some cases, such as when dealing with self-signed or expired certificates, you may encounter SSL verification errors.
By setting verify=False, you are instructing requests to skip SSL certificate verification and accept any certificate presented by the server, regardless of its validity.
Check the SSL Certificate Chain
Verify that the server is sending the complete certificate chain, including intermediate certificates.
Some servers only send the end-entity certificate without the necessary intermediates, causing clients to fail verification.
Use openssl to inspect the certificate chain
openssl s_client -connect example.com:443 -showcerts
If the chain is incomplete, configure your server to include all intermediate certificates in the chain. This configuration depends on your server software (e.g., Apache, Nginx).
Use requests module and set ssl verify to certificate file
requests.get('https://github.com', verify='/path/to/certfile')
Let’s break it down:
This is a command using the `requests` library in Python to send a GET request to a specified URL, which is `’https://github.com’` in this case.
The `get` method initiates a GET request to a web server. The GET request method is used to retrieve data from the server.
The `verify` parameter is used to control whether we verify the server’s TLS certificate or not. It can accept a boolean or a string.
- If `verify` is set to `True` (which is the default value), it will verify the server’s TLS certificate.
- If `verify` is set to `False`, the TLS verification is skipped (which is not recommended as it can make the connection insecure).
- If `verify` is a string, it should be the path to a CA bundle to use. Certificates from the specified file will be used to verify the server’s TLS certificate. This is what’s happening in your example, where `’/path/to/certfile’` should be replaced with the path to the CA bundle on your system.
In this specific case, the command is sending a GET request to ‘https://github.com’ and verifying the server’s TLS certificate using the CA certificates in the file at ‘/path/to/certfile’.
You can download the latest CA file from here.
Update SSL certificate with PIP
we can also update our SSL certificate With PIP. All we would have to do is to update our SSL certificate directory with the following piece of code:
pip install --upgrade certifi
By upgrading pip to the latest version and updating the certifi package, you ensure that pip uses the most up-to-date SSL certificates for secure connections when installing or managing Python packages.
It’s important to note that these steps assume you have pip installed globally on your system.
If you are using a virtual environment, make sure to activate the environment before running the above commands to update the SSL certificate specifically for that environment.
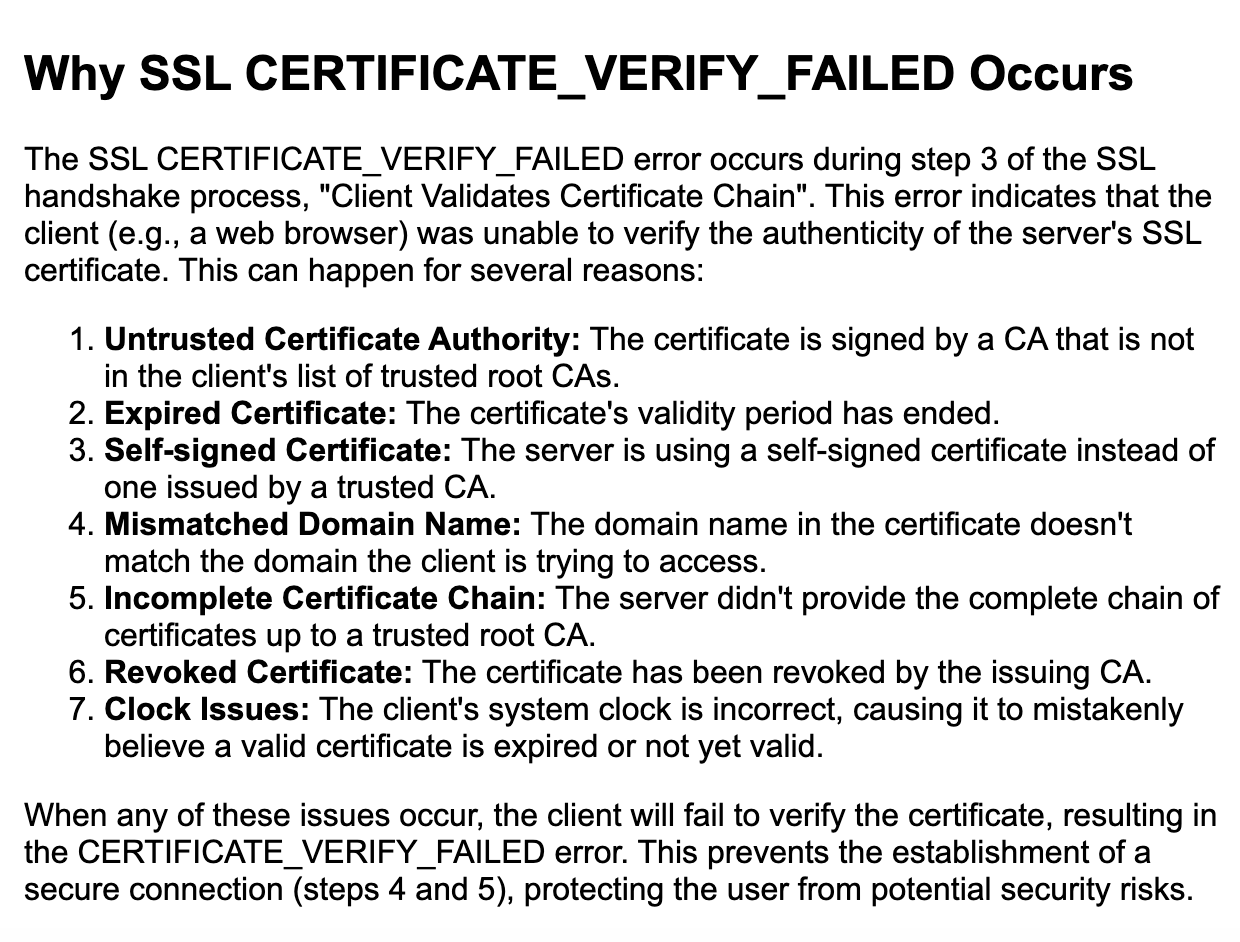
If you still haven’t fixed this issue, you can use this diagram to check it further.

Reference:

JefferyL
Wednesday 13th of November 2024
This is a very informative and well-structured article. It's a great resource for anyone dealing with SSL certificate issues in Python. Thanks for sharing such detailed insights!
Dane huen
Tuesday 30th of July 2024
As a developer who frequently works with secure connections, I find this topic to be of utmost importance and relevance in today's web development landscape.
I appreciate the step-by-step guidance you provided on how to address the `ssl.SSLError` exception. The examples of using `ssl.create_default_context()` to enforce certificate validation were particularly helpful and well-explained.
Daniel
Friday 19th of July 2024
When I use pip I still get the error that it can't upgrade the certificate because of the same error
Daniel Lim
Sunday 30th of June 2024
cool. My issue is fixed. Thanks a lot.
xmei
Friday 21st of June 2024
Thanks. It helped me a lot.